mac m1 安装 ubuntu 配置 k8s 集群
安装配置 ubuntu arm 版
iso系统镜像地址:https://cdimage.ubuntu.com/releases/20.04/release/
选择20.04版本的live-server-arm64
使用pd软件安装虚拟机,基本就是下一步下一步,额外的就是要选一下安装open ssh server用来进行远程登录的,之后就是等待安装完成重启。
配置静态 IP
重启之后,切换root用户安装网络工具
# 切换 root 用户
sudo su
apt update -y
apt install net-tools -y

# 查看网卡信息
ifconfig
网卡名为
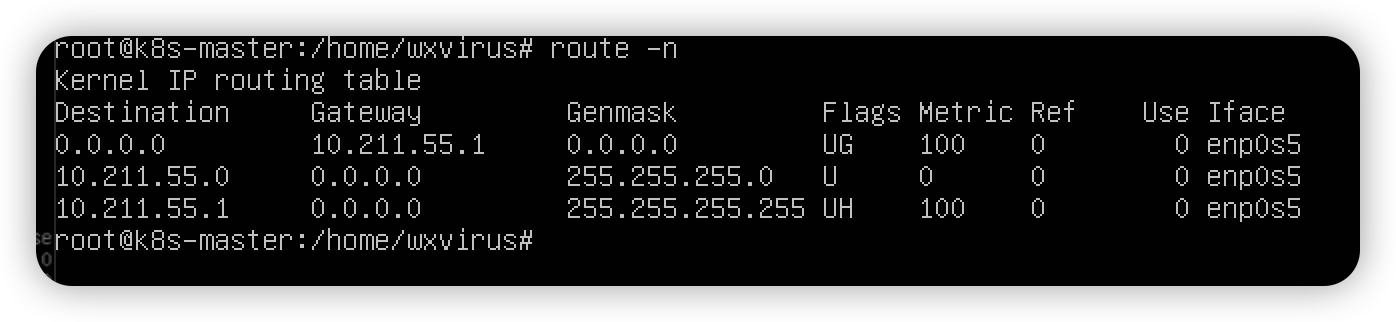
enp0s5,当前ip为:10.211.55.5,子网掩码为255.255.255.0,网关地址为:10.211.55.1
安装网络管理工具
apt install -y network-manager

# 进入对应的目录备份配置文件
cd /etc/netplan
cp 00-install-config.yaml 00-install-config.yaml.bak最终修改为
netowork:
	ethernets:
		enp0s5:
			dhcp4: no
			dhcp6: no
			addresses: [10.211.55.40/24] # 静态 ip
			gateway4: 10.211.55.1
			nameservers:
				addresses: [8.8.8.8, 114.114.114.114]
	version: 2
renderer: NetworkManager让配置生效
netplan apply生效过后再次查看本机ip
ifconfig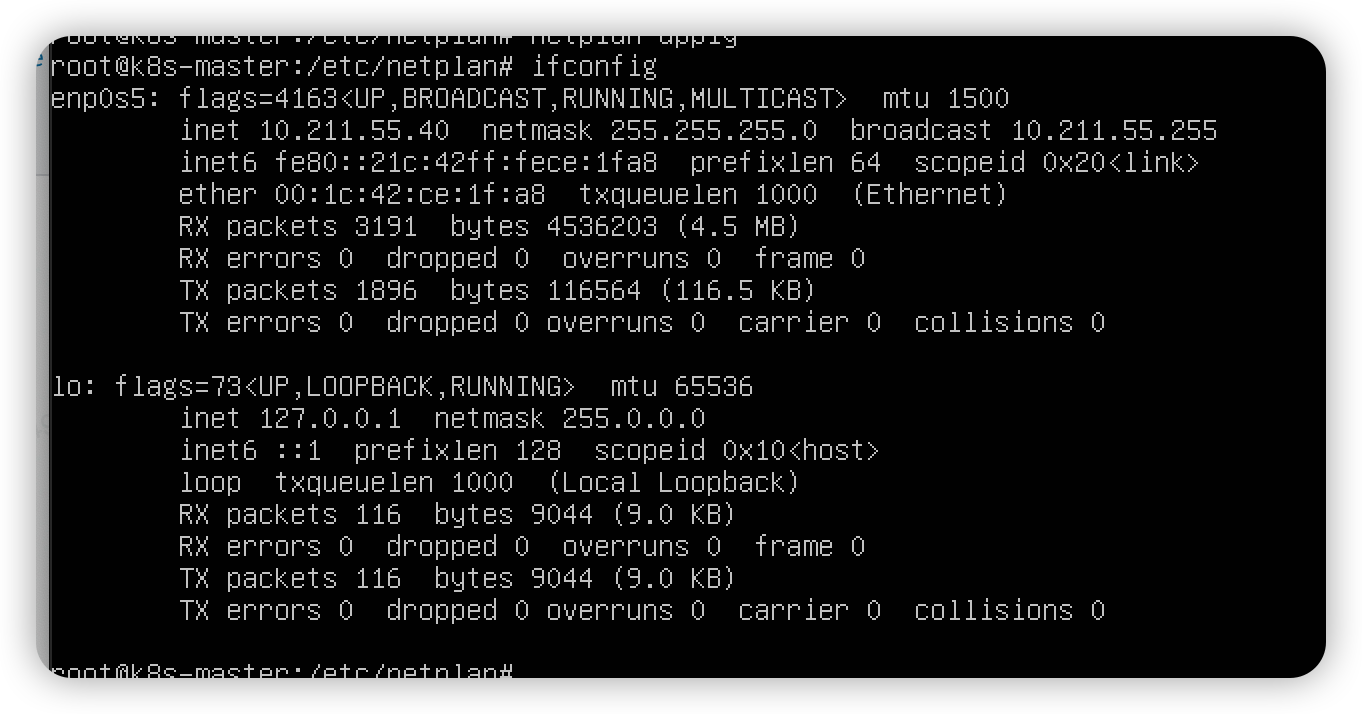
此时可以看到
ip已经是我们刚才设置的静态ip
更换 apt 软件源
# 先备份
cp /etc/apt/sources.list /etc/apt/sources.list.bak阿里的Ubuntu Ports镜像源文档地址:https://developer.aliyun.com/mirror/ubuntu-ports?spm=a2c6h.13651104.0.0.2db94763fB2bfC
软件源地址:https://mirrors.aliyun.com/ubuntu-ports/
此时你就可以去使用一些ssh软件进行连接,在ubuntu-live-server里操作终端始终不得劲。
ssh root@10.211.55.40
# 输入密码即可配置中科大的源
sed -i 's/http:\/\/ports.ubuntu.com/http:\/\/mirrors.ustc.edu.cn/g' /etc/apt/sources.list

# 更新软件源
apt update提示
上面是主节点的安装和一些配置,下面在分别整 2 个ip分别是
- 10.211.55.41 k8s-node1
- 10.211.55.42 k8s-node2
部署 K8S 集群
前置工作
master节点配置etc/hosts文件。注意要切换到root用户
vim /etc/hosts

10.211.55.40 k8s-master
10.211.55.41 k8s-node1
10.211.55.42 k8s-node2关闭防火墙
# 查看状态
systemctl status ufw.service
# 关闭
systemctl stop ufw.service
# 禁用
systemctl disable ufw.service关闭 swap
systemctl status swap.target
systemctl stop swap.target
systemctl disable swap.target

systemctl status swap.img.swap
systemctl stop swap.img.swap

free -m

root@k8s-master:/home/wxvirus# free -m
              total        used        free      shared  buff/cache   available
Mem:           1974         177        1249           1         547        1710
Swap: 0 0 0第二行全是 0 说明关掉了。
注释掉最后的
swap的一行
vim /etc/fstab
# /swap.img     none    swap    sw      0       0


# 重启
reboot修改内核参数
# 开启 ipv4 的转发功能
tee /etc/sysctl.d/k8s.conf <<-'EOF'
net.ipv4.ip_forward = 1
EOF

sysctl -p /etc/sysctl.d/k8s.conf安装
ipvsdm
apt install -y ipvsadmcat > /etc/modules-load.d/ipvs.conf << EOF
ip_vs_dh
ip_vs_fo
ip_vs_ftp
ip_vs
ip_vs_lblc
ip_vs_lblcr
ip_vs_lc
ip_vs_mh
ip_vs_nq
ip_vs_ovf
ip_vs_pe_sip
ip_vs_rr
ip_vs_sed
ip_vs_sh
ip_vs_wlc
ip_vs_wrr
nf_conntrack
EOF
systemctl enable --now systemd-modules-load.service
lsmod | grep ip_vs
reboot
# 重启后再执行
lsmod | grep ip_vs
# 就会有内容了安装 docker
# 更新源
apt-get update

apt-get install \
ca-certificates \
curl \
gnupg \
lsb-release

mkdir -p /etc/apt/keyrings

curl -fsSL https://download.docker.com/linux/ubuntu/gpg | sudo gpg --dearmor -o /etc/apt/keyrings/docker.gpg

echo "deb [arch=$(dpkg --print-architecture) signed-by=/etc/apt/keyrings/docker.gpg] https://download.docker.com/linux/ubuntu $(lsb_release -cs) stable" | sudo tee /etc/apt/sources.list.d/docker.list > /dev/null安装
docker-engine
# 更新源
apt-get update

apt-get install docker-ce docker-ce-cli containerd.io docker-compose-plugin使用docker命令测试
docker images

systemctl status docker
systemctl enable docker
systemctl start docker配置
docker镜像和cgroupdriver
cat > /etc/docker/daemon.json <<-EOF
{
	"registry-mirrors": [
		"https://docker.mirrors.ustc.edu.cn",
		"https://registry.docker-cn.com"
	],
	"exec-opts": ["native.cgroupdriver=systemd"],
	"log-driver": "json-file",
	"log-opts": {
		"max-size": "100m"
	},
	"storage-driver": "overlay2"
}
EOF重启
docker读取最新配置
systemctl daemon-reload
systemctl restart docker安装 kubeadm、kubectl、kubelet
官方镜像很慢,我们使用阿里云的镜像 https://developer.aliyun.com/mirror/kubernetes?spm=a2c6h.13651102.0.0.70be1b11GnjIXI
apt-get update && apt-get install -y apt-transport-https

curl https://mirrors.aliyun.com/kubernetes/apt/doc/apt-key.gpg | apt-key add -

cat <<EOF >/etc/apt/sources.list.d/kubernetes.list
deb https://mirrors.aliyun.com/kubernetes/apt/ kubernetes-xenial main
EOF

apt-get update

# 这里没有指定版本
apt-get install -y kubelet kubeadm kubectl

# 安装指定版本,否则会出现版本不兼容问题!!!!
apt-get install kubelet=1.23.5-00 kubeadm=1.23.5-00 kubectl=1.23.5-00

kubeadm versioncentos在对应文档有其对应的命令。
初始化集群
提示
k8s版本也得指定版本,最新版可能会有问题
apiserver设置为master节点的ip地址,我们配置的静态ip
pod-network-cidr需要和后面flannel网络插件中的yaml文件配置的Network一致,固定值10.244.0.0/16
image-repository配置阿里云镜像
kubeadm init \
--kubernetes-version=v1.23.5 \
--apiserver-advertise-address=10.211.55.40 \
--pod-network-cidr=10.244.0.0/16 \
--image-repository registry.aliyuncs.com/google_containers如果集群初始化失败,重置后重新安装
kubeadm reset初始化成功
Your Kubernetes control-plane has initialized successfully!

To start using your cluster, you need to run the following as a regular user:

  mkdir -p $HOME/.kube
  sudo cp -i /etc/kubernetes/admin.conf $HOME/.kube/config
  sudo chown $(id -u):$(id -g) $HOME/.kube/config

Alternatively, if you are the root user, you can run:

  export KUBECONFIG=/etc/kubernetes/admin.conf

You should now deploy a pod network to the cluster.
Run "kubectl apply -f [podnetwork].yaml" with one of the options listed at:
  https://kubernetes.io/docs/concepts/cluster-administration/addons/

Then you can join any number of worker nodes by running the following on each as root:

kubeadm join 10.211.55.40:6443 --token 3ukdeg.m1jot1qii00ilyi2 \
        --discovery-token-ca-cert-hash sha256:caa3e1de6baad14a4413e7f4b68733e215f8ad2c3243f3a83cc9f66258838ea5
token是 24 小时有效的,过期了需要重新生成
因为我现在是root用户,所以直接使用root用户对应的命令
export KUBECONFIG=/etc/kubernetes/admin.conf

echo "export KUBECONFIG=/etc/kubernetes/admin.conf" >> ~/.bash_profile

# 暴露环境变量 root 用户 一次生效
echo "export KUBECONFIG=/etc/kubernetes/admin.conf" >> /etc/profile
source /etc/profile
echo $KUBECONFIG


# root 用户,每次重启也能生效
echo "source /etc/profile" >> /root/.bashrc
source /root/.bashrc

reboot查看集群情况
root@k8s-master:/home/wxvirus# kubectl get nodes
NAME         STATUS     ROLES                  AGE     VERSION
k8s-master   NotReady   control-plane,master   7m57s   v1.23.5
root@k8s-master:/home/wxvirus# kubectl get pod -A
NAMESPACE     NAME                                 READY   STATUS    RESTARTS   AGE
kube-system   coredns-6d8c4cb4d-bz5kp              0/1     Pending   0          8m24s
kube-system   coredns-6d8c4cb4d-xc5vw              0/1     Pending   0          8m24s
kube-system   etcd-k8s-master                      1/1     Running   0          8m41s
kube-system   kube-apiserver-k8s-master            1/1     Running   0          8m41s
kube-system   kube-controller-manager-k8s-master   1/1     Running   0          8m39s
kube-system   kube-proxy-h28t6                     1/1     Running   0          8m24s
kube-system kube-scheduler-k8s-master 1/1 Running 0 8m39s会发现上面 2 个是pending状态的
kubectl describe pod coredns-6d8c4cb4d-bz5kp -n kube-system Warning FailedScheduling 4s (x9 over 11m) default-scheduler 0/1 nodes are available: 1 node(s) had taint {node.kubernetes.io/not-ready: }, that the pod didn't tolerate.因为那个flannel网络插件还没安装。。。
安装 flannel
git clone --depth 1 https://github.com/flannel-io/flannel.git

kubectl apply -f flannel/Documentation/kube-flannel.yaml---
kind: Namespace
apiVersion: v1
metadata:
name: kube-flannel
labels:
pod-security.kubernetes.io/enforce: privileged
---
kind: ClusterRole
apiVersion: rbac.authorization.k8s.io/v1
metadata:
name: flannel
rules:
- apiGroups:
- ""
resources:
- pods
verbs:
- get
- apiGroups:
- ""
resources:
- nodes
verbs:
- get
- list
- watch
- apiGroups:
- ""
resources:
- nodes/status
verbs:
- patch
- apiGroups:
- "networking.k8s.io"
resources:
- clustercidrs
verbs:
- list
- watch
---
kind: ClusterRoleBinding
apiVersion: rbac.authorization.k8s.io/v1
metadata:
name: flannel
roleRef:
apiGroup: rbac.authorization.k8s.io
kind: ClusterRole
name: flannel
subjects:
- kind: ServiceAccount
name: flannel
namespace: kube-flannel
---
apiVersion: v1
kind: ServiceAccount
metadata:
name: flannel
namespace: kube-flannel
---
kind: ConfigMap
apiVersion: v1
metadata:
name: kube-flannel-cfg
namespace: kube-flannel
labels:
tier: node
app: flannel
data:
cni-conf.json: |
{
"name": "cbr0",
"cniVersion": "0.3.1",
"plugins": [
{
"type": "flannel",
"delegate": {
"hairpinMode": true,
"isDefaultGateway": true
}
},
{
"type": "portmap",
"capabilities": {
"portMappings": true
}
}
]
}
net-conf.json: |
{
"Network": "10.244.0.0/16",
"Backend": {
"Type": "vxlan"
}
}
---
apiVersion: apps/v1
kind: DaemonSet
metadata:
name: kube-flannel-ds
namespace: kube-flannel
labels:
tier: node
app: flannel
spec:
selector:
matchLabels:
app: flannel
template:
metadata:
labels:
tier: node
app: flannel
spec:
affinity:
nodeAffinity:
requiredDuringSchedulingIgnoredDuringExecution:
nodeSelectorTerms:
- matchExpressions:
- key: kubernetes.io/os
operator: In
values:
- linux
hostNetwork: true
priorityClassName: system-node-critical
tolerations:
- operator: Exists
effect: NoSchedule
serviceAccountName: flannel
initContainers:
- name: install-cni-plugin
image: docker.io/flannel/flannel-cni-plugin:v1.1.2
#image: docker.io/rancher/mirrored-flannelcni-flannel-cni-plugin:v1.1.2
command:
- cp
args:
- -f
- /flannel
- /opt/cni/bin/flannel
volumeMounts:
- name: cni-plugin
mountPath: /opt/cni/bin
- name: install-cni
image: docker.io/flannel/flannel:v0.21.2
#image: docker.io/rancher/mirrored-flannelcni-flannel:v0.21.2
command:
- cp
args:
- -f
- /etc/kube-flannel/cni-conf.json
- /etc/cni/net.d/10-flannel.conflist
volumeMounts:
- name: cni
mountPath: /etc/cni/net.d
- name: flannel-cfg
mountPath: /etc/kube-flannel/
containers:
- name: kube-flannel
image: docker.io/flannel/flannel:v0.21.2
#image: docker.io/rancher/mirrored-flannelcni-flannel:v0.21.2
command:
- /opt/bin/flanneld
args:
- --ip-masq
- --kube-subnet-mgr
resources:
requests:
cpu: "100m"
memory: "50Mi"
securityContext:
privileged: false
capabilities:
add: ["NET_ADMIN", "NET_RAW"]
env:
- name: POD_NAME
valueFrom:
fieldRef:
fieldPath: metadata.name
- name: POD_NAMESPACE
valueFrom:
fieldRef:
fieldPath: metadata.namespace
- name: EVENT_QUEUE_DEPTH
value: "5000"
volumeMounts:
- name: run
mountPath: /run/flannel
- name: flannel-cfg
mountPath: /etc/kube-flannel/
- name: xtables-lock
mountPath: /run/xtables.lock
volumes:
- name: run
hostPath:
path: /run/flannel
- name: cni-plugin
hostPath:
path: /opt/cni/bin
- name: cni
hostPath:
path: /etc/cni/net.d
- name: flannel-cfg
configMap:
name: kube-flannel-cfg
- name: xtables-lock
hostPath:
path: /run/xtables.lock
type: FileOrCreate【可能会发生异常】:如果没有开启代理,拉取镜像会出现 Error:ErrImagePull 解决办法是开启本地代理,或者网上找办法先拉取国内的地址的flannel镜像
手动办法:https://www.dqzboy.com/5306.html
一波三折
root@k8s-master:/home/wxvirus# git clone --depth 1 https://github.com/flannel-io/flannel.git
Cloning into 'flannel'...
fatal: unable to access 'https://github.com/flannel-io/flannel.git/': GnuTLS recv error (-54): Error in the pull function.
root@k8s-master:/home/wxvirus# git clone --depth 1 https://github.com/flannel-io/flannel.git
Cloning into 'flannel'...
remote: Enumerating objects: 239, done.
remote: Counting objects: 100% (239/239), done.
remote: Compressing objects: 100% (221/221), done.
remote: Total 239 (delta 33), reused 109 (delta 12), pack-reused 0
Receiving objects: 100% (239/239), 2.32 MiB | 6.86 MiB/s, done.
Resolving deltas: 100% (33/33), done.root@k8s-master:/home/wxvirus# kubectl apply -f flannel/Documentation/kube-flannel.yml
namespace/kube-flannel created
clusterrole.rbac.authorization.k8s.io/flannel created
clusterrolebinding.rbac.authorization.k8s.io/flannel created
serviceaccount/flannel created
configmap/kube-flannel-cfg created
daemonset.apps/kube-flannel-ds created这里我们遇到一个问题,
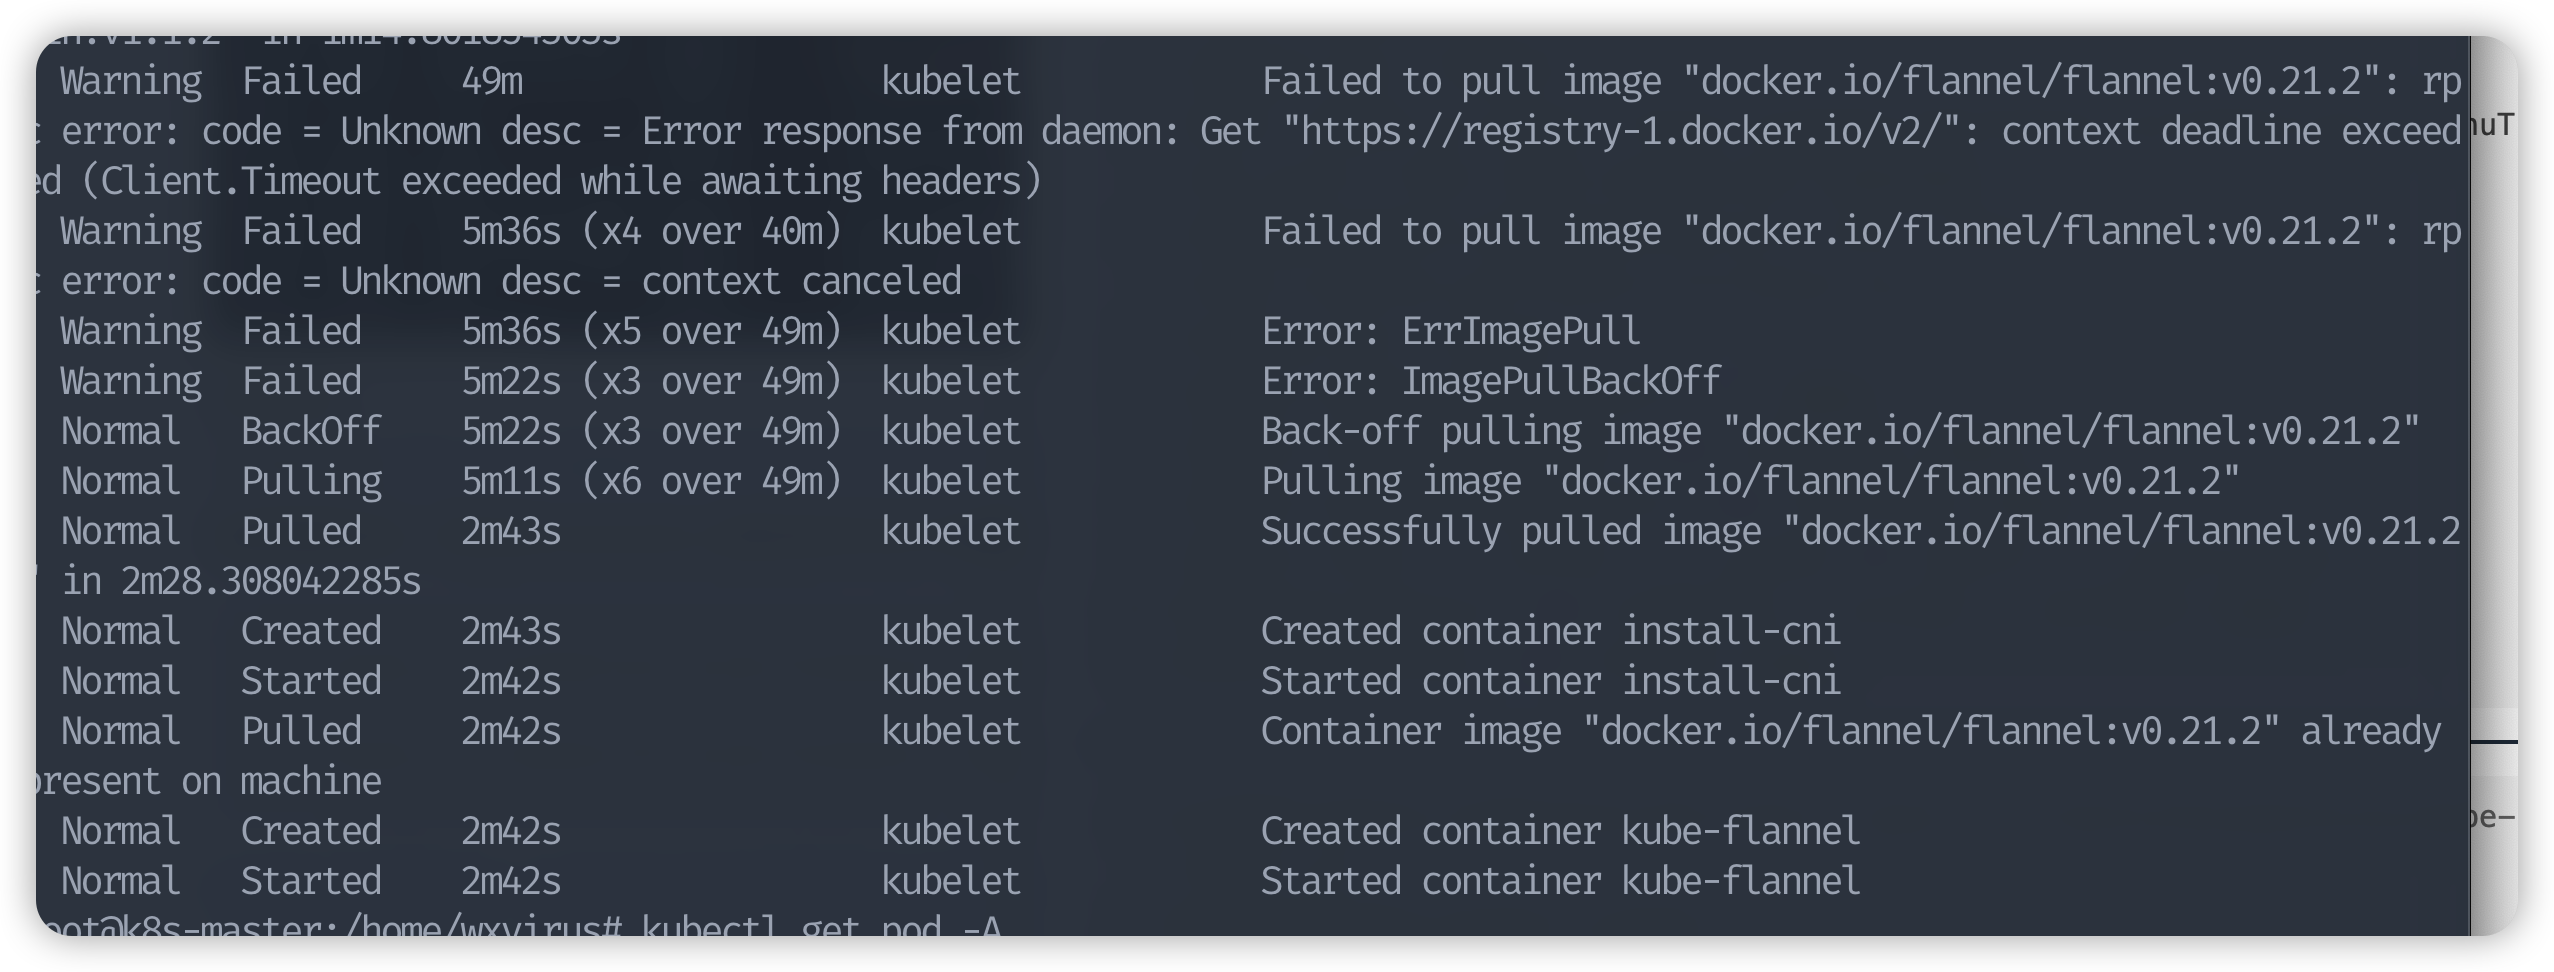
我们还是尽量尝试再去用docker在拉取一遍
docker pull docker.io/flannel/flannel:v0.21.2虽然过程较长,耗时较长,但是最终还是拉下来了;镜像拉取成功后,等一会,K8S 集群就启动成功了
但是如果有能力的,会自己编辑kube-flannel.yaml的,可以讲一些镜像换成国内的,然后在进行拉取。
最终效果
root@k8s-master:/home/wxvirus# kubectl get pod -A
NAMESPACE      NAME                                 READY   STATUS    RESTARTS   AGE
kube-flannel   kube-flannel-ds-djnrl                1/1     Running   0          50m
kube-system    coredns-6d8c4cb4d-bz5kp              1/1     Running   0          84m
kube-system    coredns-6d8c4cb4d-xc5vw              1/1     Running   0          84m
kube-system    etcd-k8s-master                      1/1     Running   0          84m
kube-system    kube-apiserver-k8s-master            1/1     Running   0          84m
kube-system    kube-controller-manager-k8s-master   1/1     Running   0          84m
kube-system    kube-proxy-h28t6                     1/1     Running   0          84m
kube-system kube-scheduler-k8s-master 1/1 Running 0 84m建议:配置
ipvs,默认均衡算法为轮询:将 44 行的mode改为ipvs
kubectl edit configmap kube-proxy -n kube-system

# vim 下显示行号
:set nu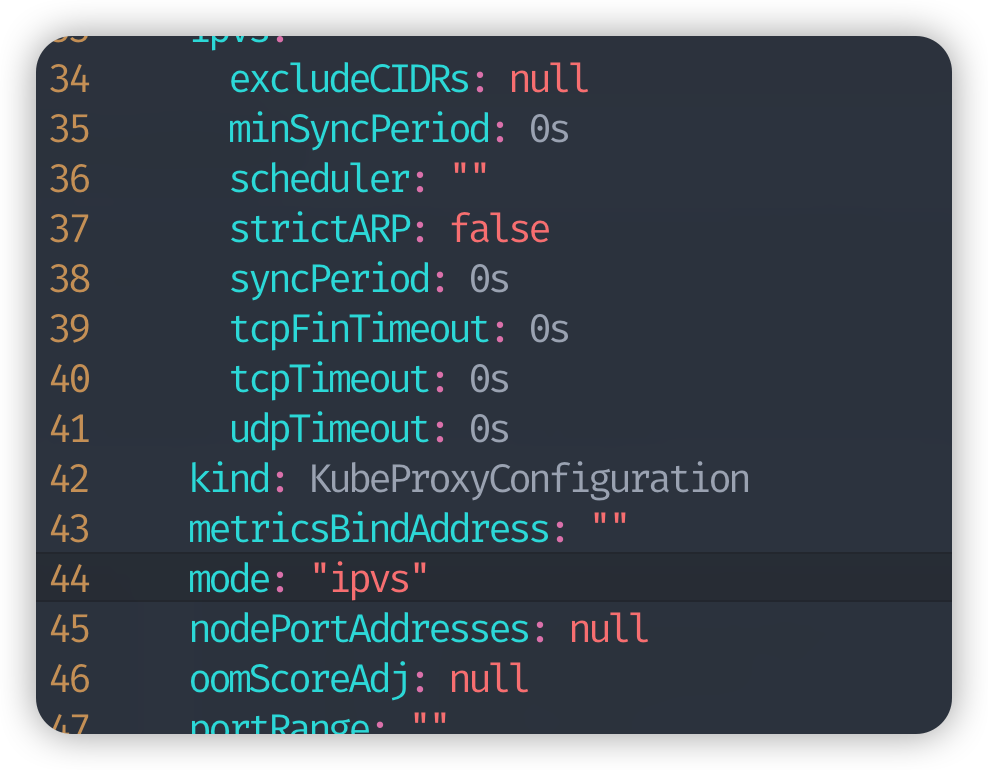
删除旧的
kube-proxy,自动会重新启动一个proxy
root@k8s-master:/home/wxvirus# kubectl get pod -A
NAMESPACE      NAME                                 READY   STATUS    RESTARTS   AGE
kube-flannel   kube-flannel-ds-djnrl                1/1     Running   0          62m
kube-system    coredns-6d8c4cb4d-bz5kp              1/1     Running   0          95m
kube-system    coredns-6d8c4cb4d-xc5vw              1/1     Running   0          95m
kube-system    etcd-k8s-master                      1/1     Running   0          96m
kube-system    kube-apiserver-k8s-master            1/1     Running   0          96m
kube-system    kube-controller-manager-k8s-master   1/1     Running   0          96m
kube-system    kube-proxy-h28t6                     1/1     Running   0          95m
kube-system    kube-scheduler-k8s-master            1/1     Running   0          96m

# 删除旧 pod
kubectl delete pod -n kube-system kube-proxy-h28t6会重新启动一个新的proxy
root@k8s-master:/home/wxvirus# kubectl get pod -A
NAMESPACE      NAME                                 READY   STATUS    RESTARTS   AGE
kube-flannel   kube-flannel-ds-djnrl                1/1     Running   0          62m
kube-system    coredns-6d8c4cb4d-bz5kp              1/1     Running   0          95m
kube-system    coredns-6d8c4cb4d-xc5vw              1/1     Running   0          95m
kube-system    etcd-k8s-master                      1/1     Running   0          96m
kube-system    kube-apiserver-k8s-master            1/1     Running   0          96m
kube-system    kube-controller-manager-k8s-master   1/1     Running   0          96m
kube-system    kube-proxy-h28t6                     1/1     Running   0          95m
kube-system    kube-scheduler-k8s-master            1/1     Running   0          96m
root@k8s-master:/home/wxvirus# kubectl delete pod -n kube-system kube-proxy-h28t6
pod "kube-proxy-h28t6" deleted
root@k8s-master:/home/wxvirus# kubectl get pod -A
NAMESPACE      NAME                                 READY   STATUS    RESTARTS   AGE
kube-flannel   kube-flannel-ds-djnrl                1/1     Running   0          64m
kube-system    coredns-6d8c4cb4d-bz5kp              1/1     Running   0          97m
kube-system    coredns-6d8c4cb4d-xc5vw              1/1     Running   0          97m
kube-system    etcd-k8s-master                      1/1     Running   0          98m
kube-system    kube-apiserver-k8s-master            1/1     Running   0          98m
kube-system    kube-controller-manager-k8s-master   1/1     Running   0          98m
kube-system    kube-proxy-x6g86                     1/1     Running   0          1s
kube-system kube-scheduler-k8s-master 1/1 Running 0 98m查看配置
ipvsadm -Ln

root@k8s-master:/home/wxvirus# kubectl logs -n kube-system kube-proxy-x6g86 | grep ipvs
I0224 17:11:04.673561       1 server_others.go:269] "Using ipvs Proxier"
I0224 17:11:04.673577 1 server_others.go:271] "Creating dualStackProxier for ipvs"如果虚拟机重启之后,
k8s集群没有启动,重新启动k8s集群正常情况下,
kubelet会自动启动的
# 启动 kubelet
systemctl enable kubelet

# 查看状态
systemctl status kubelet

# 如果 linux 关机了,重启k8s
systemctl daemon-reload
systemctl restart kubelet

# 使用 kubectl 查看是否启动成功 需要切换到 root 用户
kubectl get nodes机器重启
再次设置环境变量
echo "export KUBECONFIG=/etc/kubernetes/admin.conf">>/etc/profile
source /etc/profile
echo $KUBECONFIG

kubectl get nodes

# root 用户,每次重启也能生效
echo "source /etc/profile" >> /root/.bashrc
source /root/.bashrc

rebootwoker 节点
worker 节点,我们在安装 master 节点的时候,在没进行部署
k8s相关的任何部分的那一刻,就可以去克隆虚拟机镜像了,省的后面还得再来一套docker安装,配置啥的。这个时候你可以同时给你 2 个
node节点同时安装
我们是没有安装docker,还得来一遍docker安装配置的
我们再到安装kubeadm。。。
apt-get update && apt-get install -y apt-transport-https

curl https://mirrors.aliyun.com/kubernetes/apt/doc/apt-key.gpg | apt-key add -

cat <<EOF >/etc/apt/sources.list.d/kubernetes.list
deb https://mirrors.aliyun.com/kubernetes/apt/ kubernetes-xenial main
EOF

apt-get update

# 这里没有指定版本
apt-get install -y kubelet kubeadm kubectl

# 安装指定版本,否则会出现版本不兼容问题!!!!
apt-get install kubelet=1.23.5-00 kubeadm=1.23.5-00 kubectl=1.23.5-00

kubeadm version在使用master节点的生成的内容加入集群
kubeadm join 10.211.55.40:6443 --token 3ukdeg.m1jot1qii00ilyi2 \
        --discovery-token-ca-cert-hash sha256:caa3e1de6baad14a4413e7f4b68733e215f8ad2c3243f3a83cc9f66258838ea5
token有效期为 24 小时,过期后需要重新生成
# master 节点查看 token list
kubeadm token listroot@k8s-node1:/home/wxvirus# kubeadm join 10.211.55.40:6443 --token 3ukdeg.m1jot1qii00ilyi2 \
> --discovery-token-ca-cert-hash sha256:caa3e1de6baad14a4413e7f4b68733e215f8ad2c3243f3a83cc9f66258838ea5
[preflight] Running pre-flight checks
[WARNING SystemVerification]: this Docker version is not on the list of validated versions: 23.0.1. Latest validated version: 20.10
[preflight] Reading configuration from the cluster...
[preflight] FYI: You can look at this config file with 'kubectl -n kube-system get cm kubeadm-config -o yaml'
W0224 17:49:08.708669 6836 utils.go:69] The recommended value for "resolvConf" in "KubeletConfiguration" is: /run/systemd/resolve/resolv.conf; the provided value is: /run/systemd/resolve/resolv.conf
[kubelet-start] Writing kubelet configuration to file "/var/lib/kubelet/config.yaml"
[kubelet-start] Writing kubelet environment file with flags to file "/var/lib/kubelet/kubeadm-flags.env"
[kubelet-start] Starting the kubelet
[kubelet-start] Waiting for the kubelet to perform the TLS Bootstrap...
This node has joined the cluster:
* Certificate signing request was sent to apiserver and a response was received.
* The Kubelet was informed of the new secure connection details.
Run 'kubectl get nodes' on the control-plane to see this node join the cluster.然后我们可以去master节点查看
kubectl get nodes要等一会,等
worker节点启动完成;我安装的时候会等很久,还是那个flannel的问题,拉的太费时间了。
在 worker 节点使用kubectl
在master节点下把admin.conf复制一份到worker节点
scp /etc/kunernetes/admin.conf worker节点的用户@worker节点的ip:~在切换到对应的worker节点去查看
cd ~
# 如果是对应的用户目录则会在 /home/xxx 下

# 移动
mv admin.conf /etc/kubernetes/


#然后重复操作
echo "export KUBECONFIG=/etc/kubernetes/admin.conf">>/etc/profile
source /etc/profile
echo $KUBECONFIG

kubectl get nodes

# root 用户,每次重启也能生效
echo "source /etc/profile" >> /root/.bashrc
source /root/.bashrc

rebootroot@k8s-master:/home/wxvirus# kubectl get nodes
NAME STATUS ROLES AGE VERSION
k8s-master Ready control-plane,master 161m v1.23.5
k8s-node1 Ready <none> 24m v1.23.5
k8s-node2 Ready <none> 24m v1.23.5
root@k8s-master:/home/wxvirus#最终都Ready则成功了。